Wednesday, February 15, 2017

Cheaters Fried Ice Cream

Just in time for your next Fiesta night!  Fried ice cream is a dessert made from a breaded scoop of ice cream that is quickly deep-fried creating a warm, crispy shell around the still-cold ice cream.  It is mainly associated with the Mexican cuisine. Recently we had some friends over for a Mexican theme night and decided we would try this.

Ingredients
  • 5 cups corn flakes cereal
  • 1/2 cup salted butter
  • 2 tsp ground cinnamon
  • Vanilla bean cream, firm enough to shape but just soft enough to scoop
  • Optional servings suggestions:  honey or caramel sauce, chocolate fudge sauce, sweetened whipped cream, cherries 
Directions 
  • Pour cornflakes into a large Ziploc bag, seal bag and use a rolling pin to crush cornflakes.
  • Melt butter in a non-stick 10-inch fry pan over medium heat.   Once butter is melted, stir in crushed corn flakes and cinnamon and increase heat slightly. Cook mixture stirring constantly until golden brown and fragrant (color will deepen and begin to smell lightly toasty and corn flakes should be crisp), about 2 minutes.  Remove from heat, pour mixture in a shallow dish and allow to cool slightly. Use a form to break mixture down if desired.
  • Remove ice cream from freezer, scoop out desired serving size. Shape into ball with clean hands. Immediately drop shaped ice cream ball into corn flake mixture and roll to evenly coat, while pressing corn flake mixture around the outer surface for a thicker coating as desired.  Serve immediately topped with optional toppings, or place in freezer in an airtight container (without toppings) and chill until serving.

Tupps Tidbits:  Trick to success with this recipe is the time in the freezer, I think, which allows the ice cream to freeze until it's completely solid.  If you can make it the day or night (without toppings) before is best.

The taste turned out quit good.  We served it with warm honey drizzled on top with whipped cream and cherries.   It looks fabulous and impressive when you serve it.  Next time, I would add a bit more cinnamon to the ice cream. This recipe is a KEEPER in our HOUSE! YUMO!


Where did we find this?  www.cookingclassy.com

Wednesday, February 8, 2017

No Knead Pan Pizza

We love making homemade pizza at our house! That's why we are always on the look out for the best crust. This recipe calls for making a deep dish pizza in the cast iron skillet. Cast iron has been used for cooking for thousands of years but fell out of favor in the 60s and 70s when Teflon-coated aluminum non stick cookware was introduced. You will find that most cooks and chefs still recommended  the cast iron as an essential part of any kitchen.

 "Interesting" research states the "way"  you eat your pizza can provide important clues about your personality type.

How do you  eat your slice?

If you fold it: Those who fold their pizza slice are considered "drivers." They're multi-taskers; they want to eat the pizza fast, and eat it while doing something else.

If you start with the crust: People who eat the crust first are described as “influencers” who are spontaneous and like to be different.

If you use a knife and fork: Those who cut their pizza are generally known as “supporters.” The research says they approach life relaxed and are warm and friendly listeners who likely let their friends get their slice first.

If you just pick it up and bite:
Those who eat it with their hands and bite their slice are known as the "careful correctors." They like to plan ahead so everything turns out as expected. They usually stick with the same flavors and toppings.


Dough
2 cups all-purpose flour
1/8 tsp instant or bread machine yeast
1 tsp salt
1 Tbsp olive oil
3/4 to 1 cup water

Pizza
1 Tbsp olive oil
1/2 cup sauce
1 cup shredded mozzarella
Toppings of your choice

Instructions:
  • The day before, combine the flour salt, and yeast in a bowl.  Stir until they're very well combined.  Add 1 Tbsp of olive oil and 3/4 cups water.  Stir until the dough forms a ball.  If there is still dry flour on the bottom of the bowl or dough doesn't form a single, cohesive ball of dough add more water, 1 Tbsp at a time until the dough comes together.  The dough should be slightly sticky and shaggy in appearance.
  • Loosely cover the dough in the bowl and allow it to ferment for 12-16 hours at room temperature.  This develops the gluten, making kneading unnecessary.
  • When it's time to make the pizza, begin preheating the oven to 450 degrees.  Oil a cast iron skillet with another Tbsp of olive oil.  Use the excess oil from the skillet to oil your hands.  Pull the dough out of the bowl and place it in the oiled skillet.  Press it down into the skillet until it covers the entire bottom of the skillet.
  • Top the pizza with sauce, cheese and your desired toppings.  Cover the pizza edge to edge with the sauce, cheese and toppings.  The dough is very thick, so there is no need for a dry edge or crust around the outside.
  • Bake the pizza in the preheated oven for 18-22 minutes, or until the top is golden brown and the cheese is bubbly.


Tupps Tidbits:
First attempt at the crust!
We did attempted this recipe twice.  The first time we prepared the dough the night before as instructed and then put it in the refrigerator over night. We were "going"  to take it out of the refrigerator in the morning and let it sit at room temperate all day but we forgot until we were on our way to work and it sat in the refrigerator all day.  We took it out about 1 hour before preparing.  After baking, the crust was a bit doughy and little under cooked, so we decided to try the recipe again, doing it as instructed.

The 2nd time we prepared the crust according to instructions. It was prepared and sat out loosely covered all day at room temperate.  When it was time to make the pizza, we prebaked the  crust and sauce in the oven for about 8 minutes and then removed it and topped the pizza with cheese and toppings and baked for additional 15 minutes.

The crust was much better and completely cooked. Delicious...if you like Deep Dish this is awesome!  KEEPER IN OUR HOUSE!


Where did we find this?  https://www.budgetbytes.com/2014/08/knead-pan-pizza/

Monday, January 30, 2017

Slow Cooker Steak Soup

Let's try a recipe that crocks! The sirloin tip roast is lean and tender and the most luxurious roast, simply a four-star!  In this recipe, the sirloin is simply cut into 1-inch cubes and then slow cooked for hours. The hard part is always the waiting 7-8 hours when it smells delicious in your house all day.

2 1/4 lb sirloin tip roast, cut into 1-inch cubes
1/4 cup flour
1/2 tsp salt
1/2 tsp ground pepper
2 Tbsp canola oil
1 (1oz) envelope dry onion soup mix
4 cups beef broth
1 Tbsp tomato paste
1 Tbsp Worcestershire sauce
2 cups uncooked medium egg noodles

  • Combine roast, flour, salt and pepper in a large ziplock bag. Seal and shake to coat beef.
  • Heat oil in a large skillet over medium-high heat. Remove beef from ziplock bag, discard any excess flour mixture. Sauté beef until browned, about 5 minutes.
  • Place meat into slow cooker. Add onion soup mix, beef broth, tomato paste and Worcestershire sauce. Cook on LOW for 8 hours, until beef is tender.
  • Add noodles to slow cooker. Cover and cook on LOW for 15-30 minutes, until noodles are tender.
Tupps Tidbits: you could prep everything the night before so it would be super easy to get started prior to heading out to work

This is an extremely hearty soup. I would not change a thing with the recipe, it was perfect.
This soup was EXCELLENT! Slow cooker recipes are such an easy dish for a cold night. 
This recipe is a KEEPER in our house (we will make this again and again)!

Where did we find this?  www.plainchicken.com

Thursday, January 26, 2017

Mexi-Mac Skillet

We picked out a super easy and quick dinner that would work great for any busy weeknight.  It has a Mexican twist on goulash.  The ingredients are ones you would normally have on-hand already or are an easy add to the grocery list.


Ingredients
1 pound lean ground beef
1 large onion, chopped
1 can (14-1/2 oz) diced tomatoes, undrained
1 can (8 oz) tomato sauce
 1 cup fresh or frozen corn
1/2 c water
1-1/4 teaspoons chili powder
1 teaspoon dried oregano
1/2 teaspoon salt
2/3 cup uncooked elbow macaroni
2/3 cup shredded reduced-fat cheddar cheese


Directions:

1) In a large skillet, cook beef and onion over medium-high heat 5-7 minutes or until beef is no longer pink, breaking up beef into crumbles. Drain.

2) Stir in tomatoes, tomato sauce, corn, water and seasonings; bring to a boil. Stir in macaroni. Reduce heat; simmer, covered 15-20 minutes or until macaroni is tender. Sprinkle with cheese.

Tupps Tidbits:  There's no need to pre-cook the macaroni.  Everything comes together in one skillet.


It was a beefy, cheesy and filled with pasta and the ultimate comfort food, but we suggest to stick with your favorite goulash recipe. If you grew up eating hamburger help you might like it. It was edible and it filled us up but probably would not make its again.  This recipe is NOT A KEEPER in our HOUSE!

Where did we find this one? tasteofhome.com

Wednesday, January 18, 2017

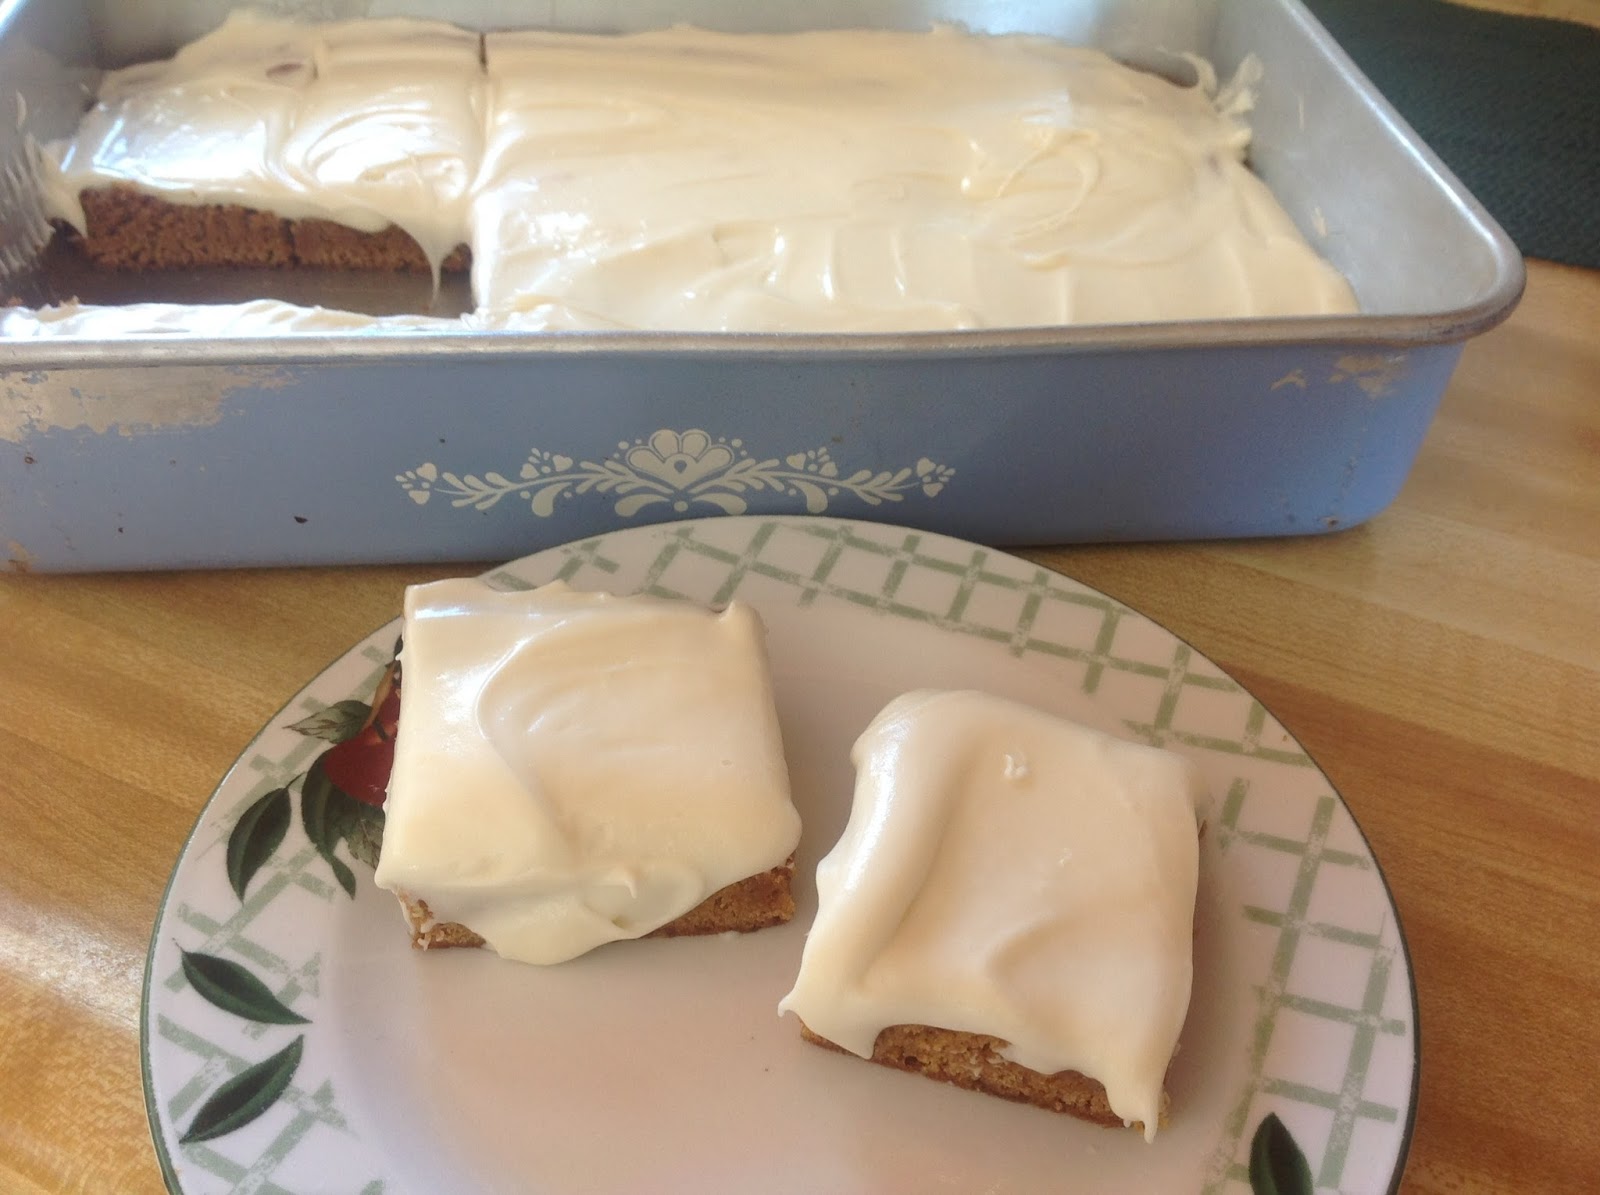
Chewy Gingerbread Cookie Bars

Are gingerbread man cookies just for Christmas? When I viewed this recipe the bars looked incredibly soft and chewy and looked like a great alternative to making individual gingerbread men.
Let's give them a try....

Ingredients
2/3 cup butter, room temperature
1 3/4 cups brown sugar
1/4 cup molasses
2 eggs
1 tablespoon vanilla extract
2 cups flour
2 teaspoons ground ginger
1 teaspoon baking powder
1/4 teaspoon baking soda
1/4 teaspoon salt

Frosting:
8 ounces cream cheese, room temperature
14 cup butter, room temperature
3 cups powdered sugar
1 teaspoon vanilla

Directions
1.  Preheat oven to 350 F.  Spray a 9X13 baking dish with non-stick cooking spray.
2.  In a large bowl, cream together the butter, brown sugar, an molasses using an electric mixer.
3.  Beat in eggs and vanilla.
4.  Stir in flour, ginger, baking powder, baking soda, and slat unit just combined.
5.  Use a rubber spatula to spread the mixture into the prepared baking dish.  Bake for 25 0- 30       minutes or until a toothpick inserted in the center comes out clean.
6.  Cool complete before frosting.
7.  To make the frosting, beat together the cream cheese, butter, powdered sugar, and vanilla in a large mixing bowl until smooth and creamy.
8.  Spread frosting over the cooled bars and serve.
9.  Store in the fridge for up to 5 days.

Tupps Tidbits:  this made way too much frosting, I would cut the frosting recipe in half

This is the first dessert recipe I have ever made and did not like. Do not get me wrong, the frosting was awesome but the bar was too strong of a gingerbread flavor.  NOT A KEEPER in our HOUSE!

Where did we find this one?  I did not save the exact location on the web, but does it matter, the recipe is not a keeper! LOL!


Monday, January 9, 2017

Minnesota Wild Rice Soup

As far as soup goes, it does not get more Minnesotan than Chicken Wild Rice Soup.Wild rice grows in abundance in Minnesota and is very populat in recipes.   Due to the harsh winters, we crave satisfying comfort food and nothing warms you up faster than a bowl of soup.  A co-worker brought this into work last year and it was fabulous.


Ingredients:
1/2 cup butter
1 cup diced carrots
1 cup diced celery
1 cup diced onions
1 cup sliced mushrooms
1/3 cup flour
3 cans chicken broth
1-2 cups cooked wild rice
1 cup half & half
chicken, duck, goose or turkey


Directions:

1.  Saute carrots, celery, onions and mushrooms in butter
2.  Add flour to absorb the butter thereby making a roux
3.  Add chicken broth slowly & stir rapidly to prevent lumps.  Add rice & meat & simmer 20 minutes
4.  Add half & half slowly, return to a simmer, do not boil, season to taste

Tupps Tidbits:  How to cook wild rice?  Using the "oven" method - wash 1/2 cup uncooked wild rice thoroughly. Combine with 1 cup water in a covered casserole. Cover and bake at 350 F for 1 hour. Check wild rice. Ad more water, if needed, and fluff with fork.  Continue baking for 1/2 hour wild rice should be moist, not dry. (this makes up to 1 1/2 to 2 cups)

The aroma of wild rice while it cooks is amazing. I am sitting here blogging awaiting the the deep savory taste of this soup! To save time you could cook the chicken & wild rice and cut up vegetables the day before.

As expected, this was so delicious!  It is absolutely comfort food! This recipe is a KEEPER in our house!  I can't wait for the leftovers.

where did we find this?   Sara B. (Deanna's co-worker)

Sunday, January 8, 2017

New Year - New Recipes!

It's January 6th..."Honey do you want to try and continue with the new recipe blog this year?"...

Hi!  I’m Deanna, food eater & writer of the blog.  Sean (Tupps) is your cook. We are into our 6th year of blogging and we made yet ANOTHER New Years (Jan. 6th) resolution together to try and attempt to make and share with you 52 NEW recipes.   We have came close to completing the resolution over the past years but have not quite made it yet!

The recipes are either original, family recipes, or have been adapted from magazines, cookbooks, newspapers, and internet. The majority of the recipes comes from sources, which we always credit when we can! 

We are the photographer’s and the IPAD 2 is our camera of choice.

Email us and let us know something fabulous that you think we should know or if you tried a recipe listed in the blog and if it was a “Keeper” in your house!

Again, it is January and it is COLD in MN.  We decided to start off the New Year with a warm & hearty Minnesota soup... coming soon! 
Stay warm everyone!


No comments:s

Turkey Gnocchi Soup

What is gnocchi and how do you pronounce it?  Doesn't matter...it is good! YUMO! Gnocchi    N(Y)OK-ee  -  The word  gnocchi  may be deri...